Fading a LED using PWM pins in Arduino - Ryzen Hunt
Fading a LED using PWM pins in Arduino

Fading effect with Arduino
Hello friends, in our
previous post, we explained how to program an Arduino and also did a practical
"Blinking an LED". In this post, we would learn how to create a fading
effect using Arduino.
The fading effect is created when a LED brightens and fades gradually.
We know that Arduino's digital pins can either be HIGH or LOW and to
generate the fading effect we need to generate analog outputs (Note: Analog pins take analog input, they do not generate analog output.).
Here we would use the concept of Pulse Width Modulation or PWM.
Pulse Width Modulation (PWM) is a trick to get analog output values with
digital means. On the Arduino Board, pins marked with a " ~ " can
be used to generate PWM output. Arduino UNO has 6 digital pins that can
be used for PWM outputs (3, 5, 6, 9, 10, and 11). The PWM output lies
between 0 and 2^8 - 1 or 0 and 255.
PWM works by modulating the duty cycle of a square wave ( a signal
switched between on and off).
Now let's start our practical:
Components Required:
- Arduino UNO
- LED
- Resistance (220 kΩ)
- Breadboard
- Connecting wires
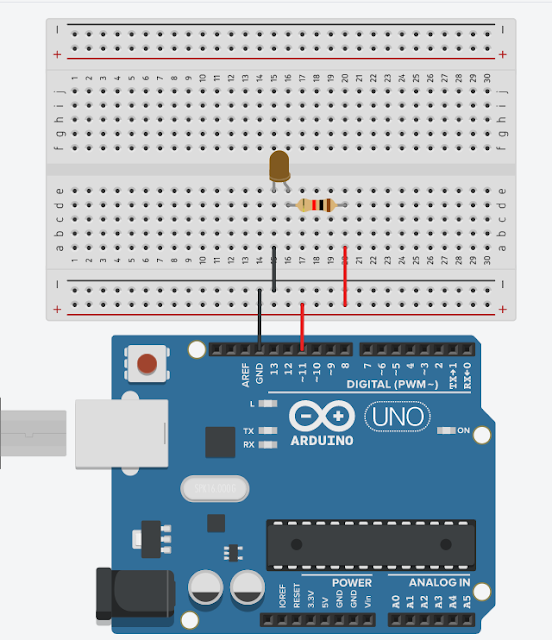
Circuit Diagram:

In the circuit given above, we connected the cathode pin of LED is
connected to the GND pin and the Anode pin is connected to the digital
pin 11 through a resistance. Now we need to write the code for this
connection.
Source Code:
In previous Practical, we used the digitalWrite() keyword, but here we
would use the analogWrite() keyword to generate analog output. The
analogWrite() takes two parameters, first is the pin number and the
second is the value that we need as output.

In our code, first, we declared a variable named " led " and assigned an
integer value 11 that's our pin number connected to the LED and then we
declared that variable " i " would have integer values. In our setup
function, we defined the pin mode of the variable as OUTPUT and in the
loop function, we used two for loops for iteration. The first for loop
is to glow the LED and the second for loop is to fade the LED.
Result:
After Uploading the Source code to the Board, We can see that the LED
glows and fades gradually and creates a fading effect by changing its
intensity.
Also check:
Hope you learned something new here. Please share this with your friends
and Don't forget to share your comments and
valuable suggestions and feedback. If you have any questions or doubts, plz feel free to ask, we would
reply soon or answer in our next post.
For visiting our Python Course Series
click here
and for HTML Course Series
click here.
